

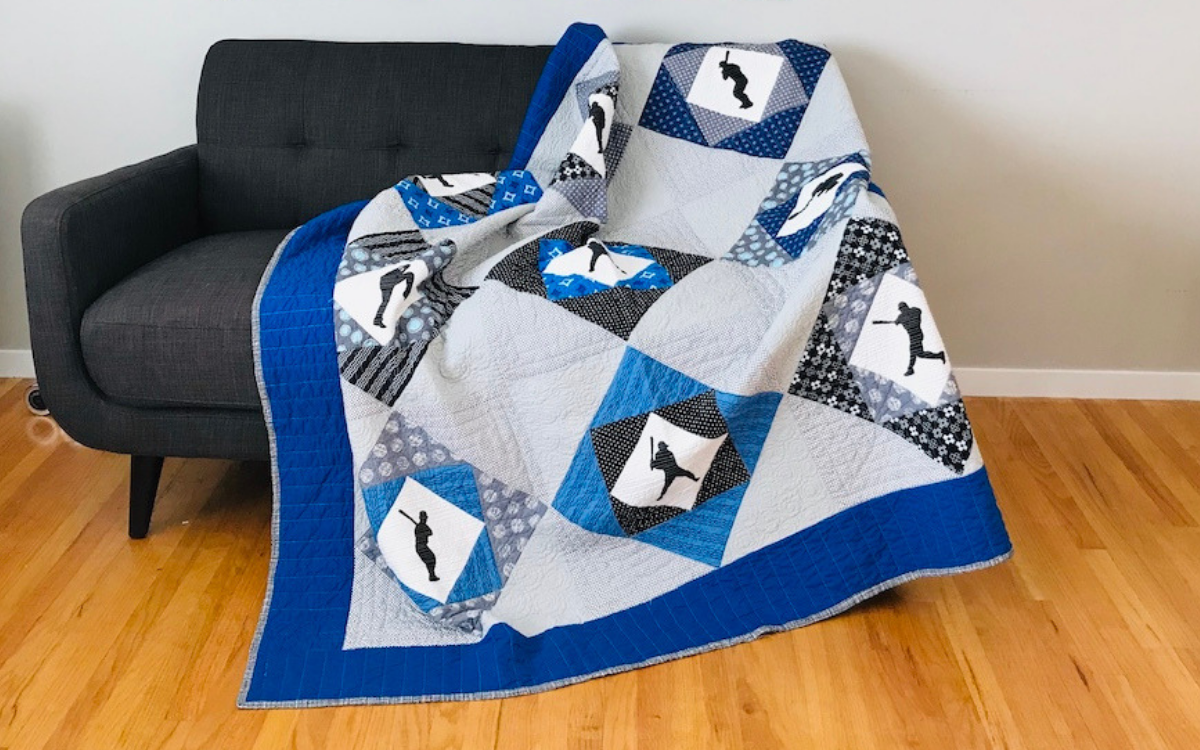
Quilting is my all time favorite thing to do, but a close second to quilting is watching my kids play sports. There’s nothing like a spending the afternoon at a sunny baseball game watching my oldest boy play center field. This quilt is inspired by hours at the ballpark watching him do what he loves very most. I used fabrics in his team colors and cut baseball player silhouette shapes with my Silhouette Portrait to make a one of a kind quilt that he will cherish for years to come.

This quilt is pretty simple and fast to create. Inspired by the economy quilt block, but with an extra layer. You will love how quickly these blocks come together.
Do your kids love sports too, but not baseball? There are several types of silhouettes to choose from in the design store. You could make this quilt with basketball players, football players, even cheerleaders or dancers!

This quilt is made with triangles so most of the sewing will be done on the bias edge. It can be tricky to work with fabrics cut on the bias because they will stretch along the bias edge. To minimize stretching I recommend starching your fabrics before you cut them. There are many starch products on the market to choose from. I have used both Faultless Starch, found anywhere, and Best Press, found at quilt shops, and had great success with both.
Here’s what you need to get started:
- Basic sewing supplies including, sewing machine, cutting mat, rotary cutter, ruler, fabric scissors, matching thread, and pins
- Marking tool such as a herra marker or removable ink pen
- Fusible web such as Heat and Bond Lite
- Silhouette CAMEO or Silhouette Portrait
- Silhouette Studio
- Silhouette Cutting Mat
- Silhouette Fabric Blade
Fabric Requirements:
- 9 fat quarters; I chose 3 black, 3 blue, 3 gray
- 1/2 yard white fabric
- 1/2 yard black fabric for silhouettes
- 1 yard gray background fabric
- 1 yard black and white print background fabric
- 1 yard border fabric
- 1/2 yard binding fabric
- 4 1/2 yard backing fabric

From the Silhouette Design Store:
- Baseball Pose Design ID #62555
- Home Run Silhouette Design ID #127085
- Catcher Silhouette Design ID #127088
- Pitcher Silhouette Design ID #127091
- Batter Up Silhouette Design ID #127082

I have many options of silhouette kits available in my shop. If you do not see the sport you were hoping for, please send me a quick email and I can see if that sport is available.
Cutting Instructions
From each fat quarter cut: 2 – 6 1/2″ squares and 2 – 9″ squares.
Cut each of these in half diagonally to make two half square triangles per square.

From white fabric cut two 7 1/2″ x width of fabric strips. Sub cut these into 9 7 1/2″ squares.
From each background fabric cut 3 – 11 1/2″ strips. Sub cut into 9 – 11 1/2″ squares per background fabric. Cut each 11 1/2″ square in half diagonally to create 18 half square triangles per fabric.
From black silhouette fabric cut two strips 7″ x width of fabric. Sub cut into at least 9 – 7″ squares. You may want one or two extra of these.
From fusible web cut 9 squares 6 3/4″. You may want to cut one or two extra incase you need to recut any silhouettes.
Cutting Silhouettes
Iron fusible web to the wrong side of each black square. Follow the manufacturer’s directions. I like to iron over each of mine twice, making sure that the web is adhered on the entire square. If there are spots that are not adhered well, they may not cut perfectly on the Silhouette.

Purchase the following designs from the Silhouette Design Store:
Baseball Pose Design ID #62555
Home Run Silhouette Design ID #127085
Catcher Silhouette Design ID #127088
Pitcher Silhouette Design ID #127091
Batter Up Silhouette Design ID #127082
- Open Baseball Pose Design ID #62555 in Silhouette Design Studio
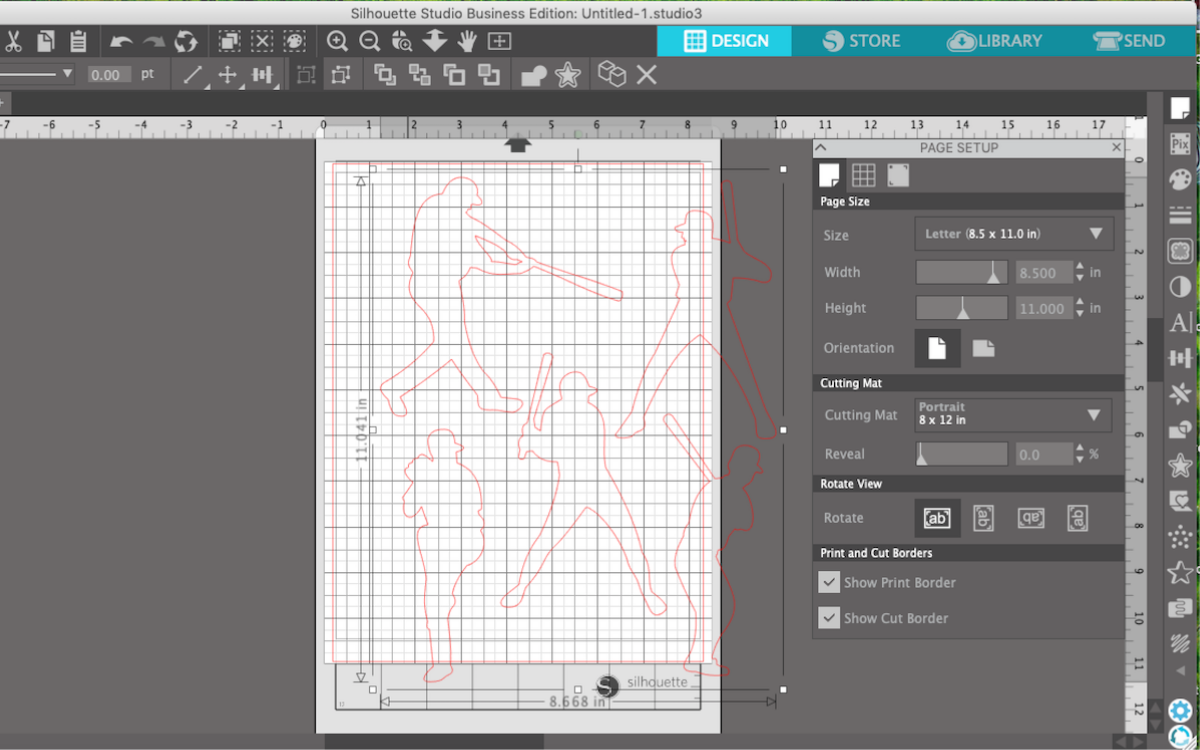
2. Ungroup the design by selecting it and from the top menu clicking Object>Ungroup
3. Slide 4 of the silhouettes off of the design area.
4. Select the remaining baseball silhouette. From the top menu select Object >Rotate >Rotate by 45 degrees clockwise
5. Slide the baseball player silhouette so that it is centered in the top left 7″ of the design area.

6. Place black square of fabric with fusible web backing on the top left corner of the cutting mat. Make sure it is securely attached. I like to leave the paper backing on the fabric.
7. Adjust fabric blade to 5 and install in Silhouette. Load cutting mat into the Silhouette.
8. In the Send Panel choose “Fabric, thin cotton print.” Send to Silhouette.
8. Carefully remove cut shape from cutting mat. You may want to have a pair of small fabric scissors on hand in case there are a few threads that need to be clipped.

Delete the image you just cut from the design area. Move another baseball player silhouette to the design area. Repeat these steps for each baseball silhouette but make the adjustments listed below.
Manually resize the following images:
- Catcher Silhouette to about 4.19″x5.85″
- Pitcher Silhouette to about 3.4″x7.2″
- Home Run Silhouette to 4.1″x8.025″
To resize the images I used the control points on the shapes selection box. Drag one of the corner points until the measurement are close to the ones above or until the shape fits nicely inside a 7″ square area.

I also changed the Home Run Silhouette to a mirror image. To do this Select the Home Run Silhouette. From the top menu click Object >Mirror >Flip Horizontally.
Remove paper backing from fabric silhouettes and set aside while you assemble the quilt top.
Make Quilt Blocks
For each quilt block you will need 1 – 7 1/2″ white square; 4 – matching 6 1/2″ triangles; 4 – matching 9″ triangles, and 2 – 11 1/2″ triangles of gray, 2 -11 /12″ triangles of the black and white print.
Arrange fabrics in stacks, mixing and matching fabrics until they are arranged how you like them.

Using a herra marker or removable ink, mark the center of each triangle. Also mark the centers of each side of the white squares.
Sew a 6 1/2″ triangle to the top and bottom of the 7 1/2″ white square. Match the centers using the marks you made in the previous step. Sew with rights sides together, using a 1/4″ seam allowance. Press the seam allowances away from the center block.
Next sew the remaining 6 1/2″ triangles to the sides of the 7 1/2″ white square. Once again match the center marks. Press the seam allowances away from the center.

Trim the block to a 10 1/2″ square. To do this lay your white square on your cutting mat with points lined up vertically and horizontally. Lay your ruler vertically on your mat, aligning with the lines on your mat. Measure 5 1/4″ from the center of the block, or 1/4″ from the right point. Trim. Rotate block using the trimmed edge as the square edge. Measure 10 1/2″ from cut edge and trim. Repeat with the opposite two sides.

Sew a 9″ triangle to the top and bottom of your 10 1/2″ square. Match the center marks with the points. Press seams to the outside of the block.
Repeat with remaining two triangles on the sides of the blocks. Match your centers and press seams away from the center.
Trim the block to 14 1/2″ using the same process as earlier.
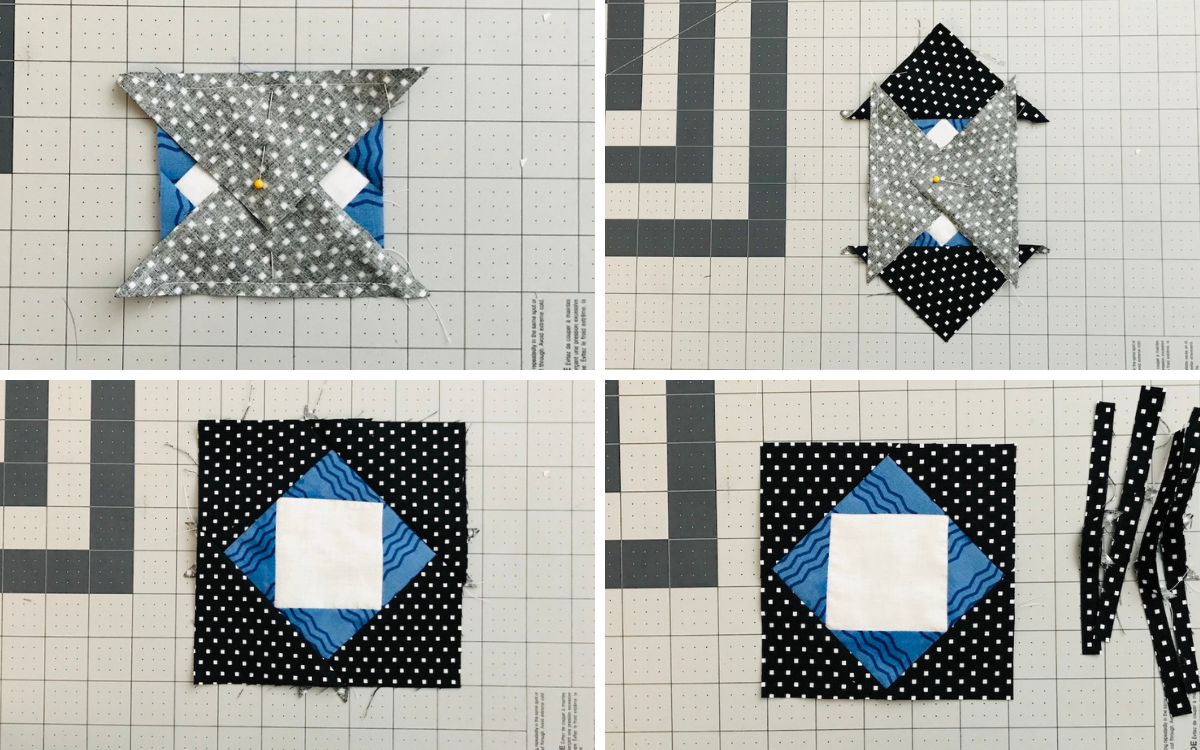
Sew two gray 11 1/2″ triangles to opposite sides of the block you just trimmed. Place right sides together and match centers. Press seams to the outside of the block.
Sew two black and white print 11 1/2″ triangles to the opposite sides of the 14 1/2″ block. Match centers with right sides together. Press seams to the out side.
Trim finished block to 20 1/2″.

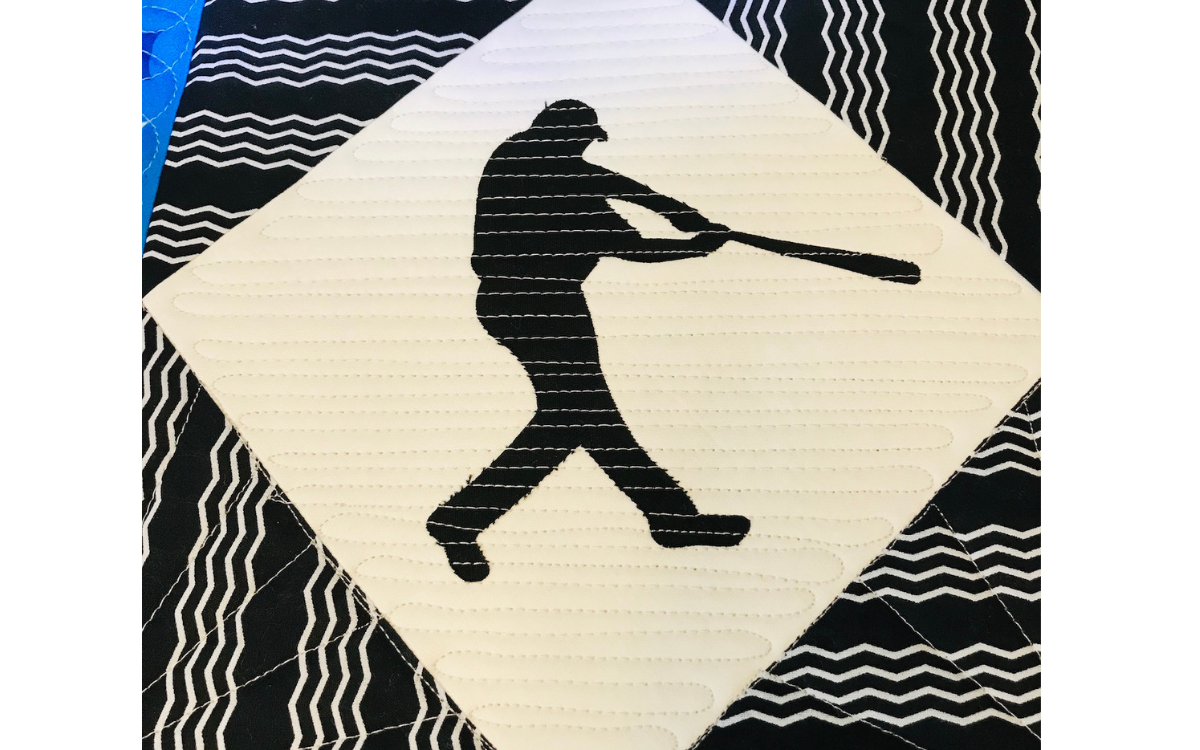
Lay your finished block on your ironing board. Make sure the gray triangle is on the upper left side. Center a baseball silhouette in the white diamond. Iron in place following the manufacturer’s directions on your fusible web product.

If you prefer, you can raw edge appliqué your baseball players to the blocks at this point. Instead, I am going to secure the baseball players later on with dense quilting.
Repeat this process for all nine stacks of fabric to create nine blocks.
Lay out the blocks in a 3×3 grid arranging them so you like the mix of fabrics. Sew rows together using a 1/4″ seam allowance. Press seam allowances to the side, alternating directions for each row.

Place center row on top row, right sides together. Match block intersections and pin. Match points and pin. Sew together with a 1/4″ seam allowance and press seams to the side. Repeat process to add bottom row.
Quilt Border
For the quilt border cut 7 – 5″ by width of fabric strips. Join strips end to end with a 1/4″ seam allowance. Press seams to one side.
Measure the left and right sides of your quilt, and cut border strips to match the size. The measurement should be about 60 1/2″. Pin strips to the sides of quilt and sew with a 1/4″ seam allowance. Press seams toward the border fabric.
Repeat with top and bottom borders. Measure top and bottom edges of the quilt. They should be close to 70″. Pin cut border strips to top and bottom edges of the quilt. Sew with a 1/4″ seam allowance. Press seams to the outside border.
Finished Quilt size is 72″x72″.
Quilt Back
Cut your 4 1/2 yard backing fabric into two sections 2 1/4 yards each. Remove the selvedge edges. Pin and sew backing sections together along one of the selvedge edges. Use a 1″ seam allowance and press to one side.
Quilt and Applique
Quilt your finished quilt top using your favorite method. I quilted mine on my long arm quilt machine. To secure the baseball player silhouettes in place and prevent them from coming loose during use and washing, I quilted them down using dense horizontal lines. When quilting try to quilt about 1/8″ away from the edges of the silhouettes. I used a light gray thread for all of the quilting on my quilt.
Binding
From binding fabric cut 7 – 2 1/2″ width of fabric strips. Use your favorite method to join strips and sew to quilt. My favorite binding method can be found here.

This Center Field quilt quickly became a favorite at our house! I backed this quilt with the perfect blue and black plaid flannel. I love the added warmth flannel provides. Inside the quilt is my favorite 100% bamboo batting from Winline. Bamboo batting has the best drape of any batting I have tried and therefore makes the most cuddly quilts!
What is the finished size of this quilt?
Hi Tori! This quilt finishes as 72×72. It’s a really fun one to make!